Python后端部署-Part1
Python后端部署-Part1——Web项目总览
[TOC]
快速使用
施工中……
手动部署全流程
服务器 Nginx+uwsgi+Django 配置
创建项目的 Docker 容器
拉取 ubuntu 镜像
1
$ docker pull django/ubuntu:20.04
创建容器
1
$ docker run -it --name WebService -p 9045:22 -p 9046:80 -p 9048:8000 -p 9049:8080 -v /data/WebService:/data/WebService -d ubuntu:20.04 /bin/bash
- -p 9045:22 用于 ssh 连接
- -p 9046:80 用于 Nginx 代理
- -p 9048:8000 用于 Django 测试
- -p 9049:8080 用于 Vue 测试
- -v /data/WebService:/data/WebService 将宿主机与容器内的项目根目录进行挂载
进入容器(后续操作都在容器中进行)
1
$ docker exec -it WebService bash
保持运行并退出容器
1
ctrl + p + q
ssh 连接(可选)
服务端搭建 ssh 服务
安装服务器
1
2
$ apt-get update
$ apt-get install openssh-server生成秘钥
1
2
3
4
5
6
7
8
9
10
11
12
13
14
15
16
17
18
19
20
21
22
$ ssh-keygen -t rsa
Generating public/private rsa key pair.
Enter file in which to save the key (/root/.ssh/id_rsa): # 这里回车
Created directory '/root/.ssh'.
Enter passphrase (empty for no passphrase): # 这里回车
Enter same passphrase again: # 这里回车
Your identification has been saved in /root/.ssh/id_rsa
Your public key has been saved in /root/.ssh/id_rsa.pub
The key fingerprint is:
SHA256:7JmFyqQScZ5pTgQPro31HbSRQ0WhOXfaj36OlVW6rTY root@ac5b1c2f2ed8
The key's randomart image is:
+---[RSA 3072]----+
| o .+++. |
| . + .o= |
| + + *.. . .|
| = * + = = o |
|o o B o S o o |
| = + o + o o o |
| . o o + . + . .|
| . . o. E. |
| oo.... |
+----[SHA256]-----+开放通过密码登录(如果没有开放的话)
1
2
3
4
5
6
7
8
9
$ apt-get -y install vim # 如果没有 vim 的话
$ vim /etc/ssh/sshd_config # 编辑
输入/Permi,回车,找到
#PermitRootLogin prohibit-password
取消注释, 修改成
PermitRootLogin yes
esc+:wq!退出设置密码
1
2
3
4
$ passwd
New password:
Retype new password:
passwd: password updated successfully重启 ssh 服务
1
2
$ service ssh restart
* Restarting OpenBSD Secure Shell server sshd使用 Pycharm 连接服务器
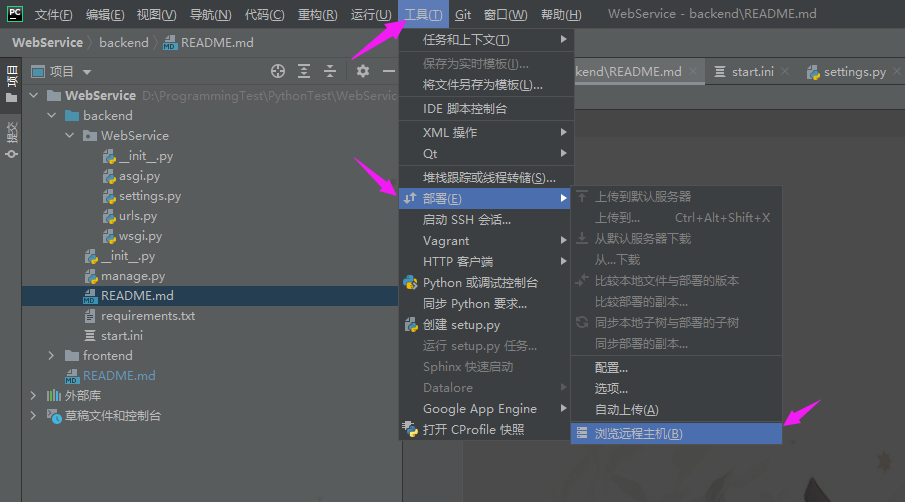
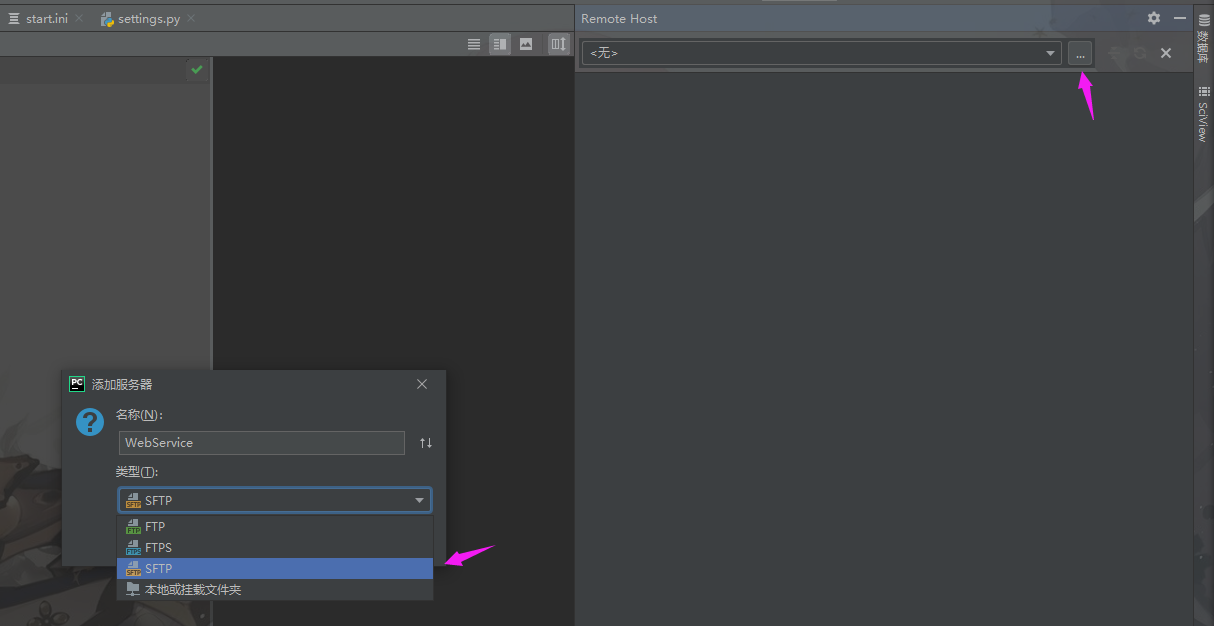
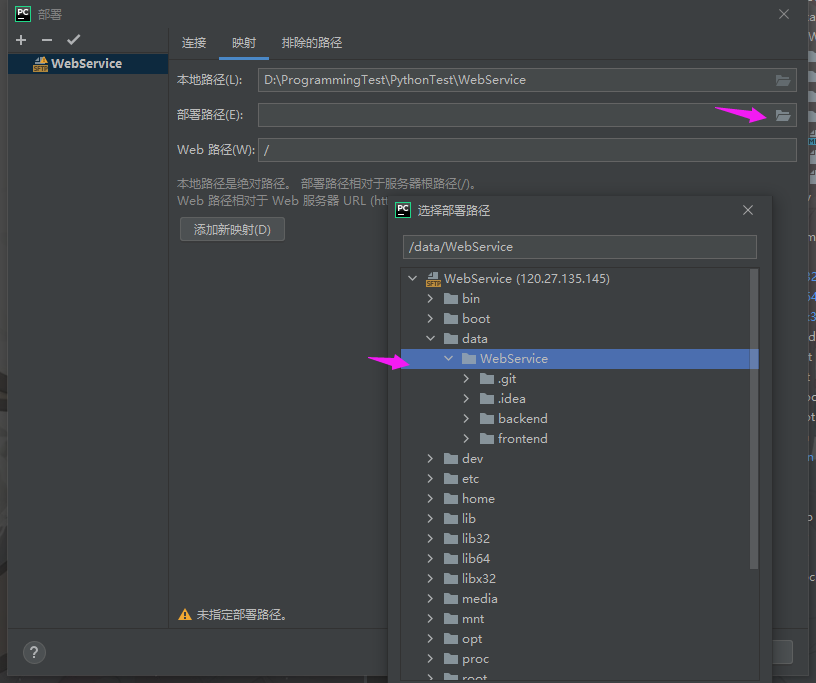
pycharm 中找到远程主机
选择 SFTP
通信使用 utf-8
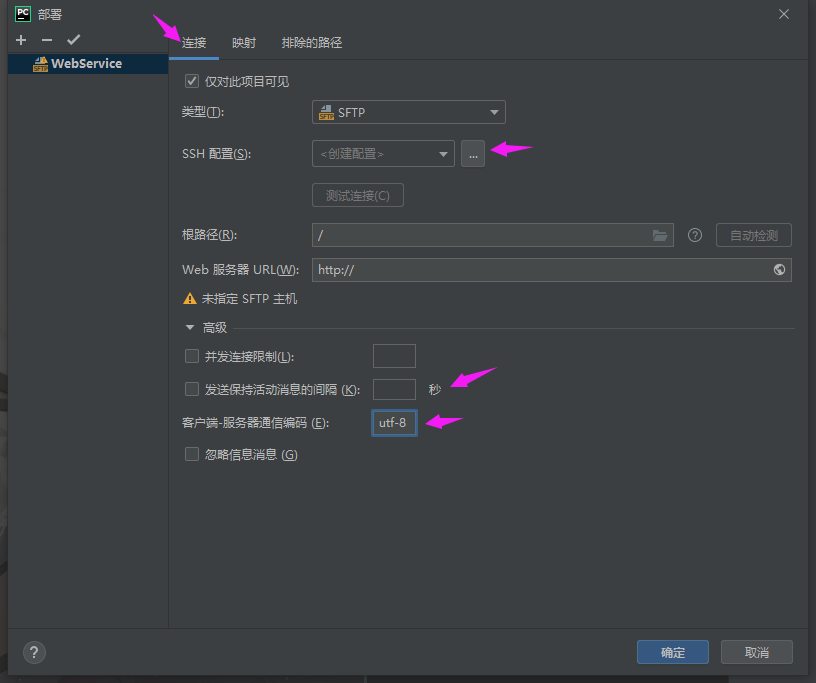
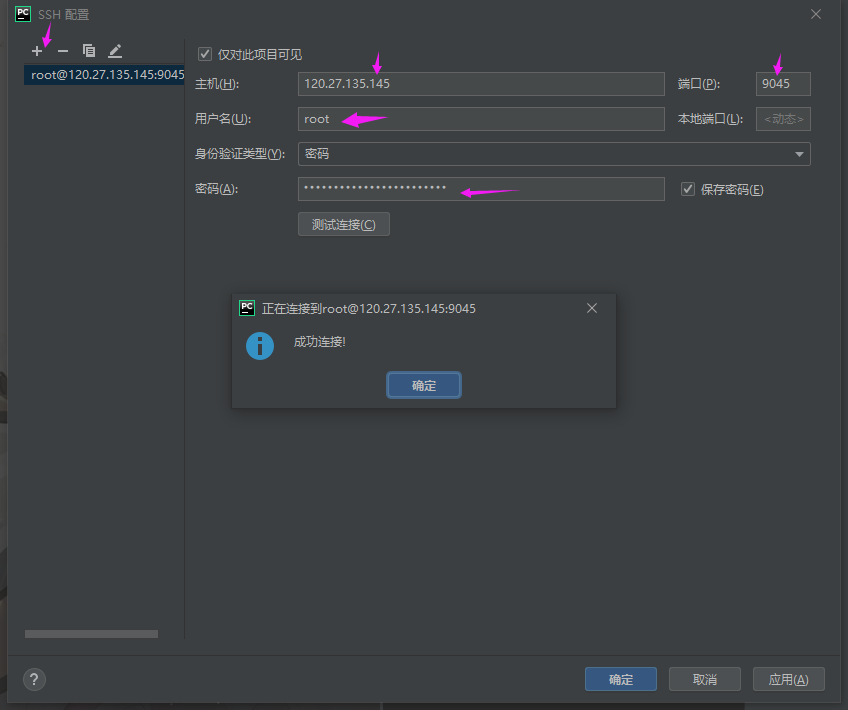
编辑 SSH 配置。由于 docker 容器的端口映射,这里的 9045 会连到容器的 22 端口。
设置映射
最终结果
同时,你可以通过
ssh -p 9045 root@120.27.135.145在控制台登录启动服务端的服务建议使用本地控制台连接服务器,后面会有启动命令
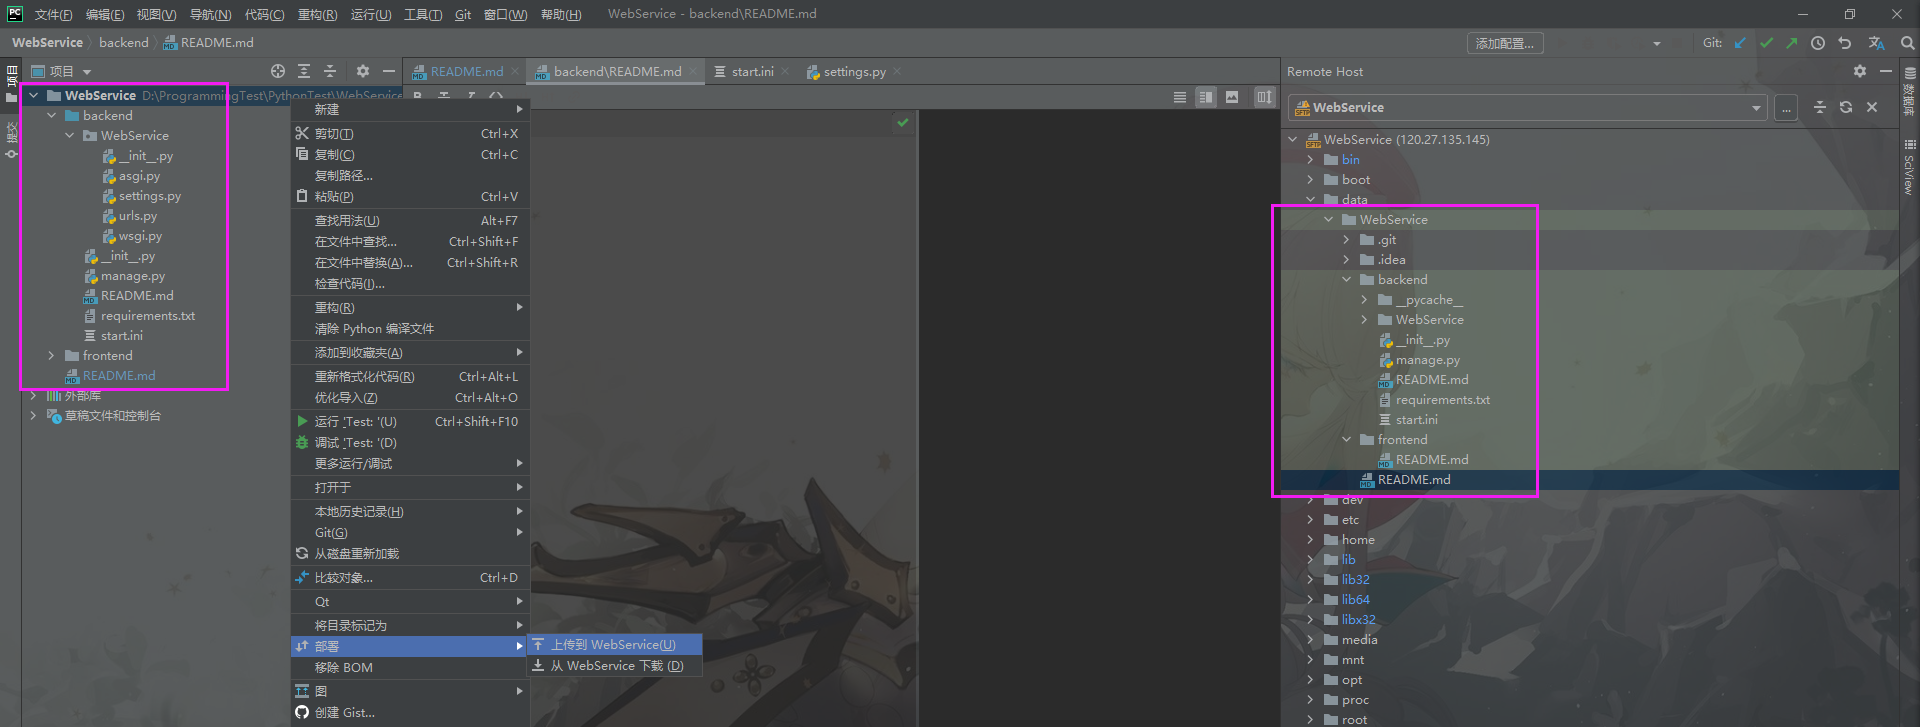

之后,你有两种方法来部署项目代码
- 使用 ssh 连接服务器,在服务器上 git pull(当然,在此之前,你需要把代码 push 到 git 仓库)
- 使用 pycharm 直接部署代码(但是同样要记得 push 代码到仓库,否则在服务器上很难察觉版本迭代)
同时,对于服务器上的文件修改,不需要再使用命令行,可以直接在 IDE 中编辑并上传。
容器内环境配置与测试
参考:
更新源,准备必要环境:git、py3、nginx、uwsgi
1
2
3
4
5
6
7
8
9
10
11
12
13
apt-get update && \
apt-get upgrade -y && \
apt-get install -y \
git \
python3 \
python3-dev \
python3-setuptools \
python3-pip \
nginx \
supervisor && \
pip3 install -U pip setuptools && \
pip3 install uwsgi && \
rm -rf /var/lib/apt/lists/*检查 python3
1
2
3
4
5
$ python3
Python 3.8.10 (default, Sep 28 2021, 16:10:42)
[GCC 9.3.0] on linux
Type "help", "copyright", "credits" or "license" for more information.拉取仓库
1
2
cd /data
git clone https://gitee.com/NephrenCake/WebService.git之后更新本地仓库
1
2
cd /data/WebService
git pull安装 pip 依赖
1
2
cd /data/WebService
pip3 install -r backend/requirements.txt使用 Django 测试服务器启动服务
1
python3 /data/WebService/backend/manage.py runserver 0.0.0.0:8000
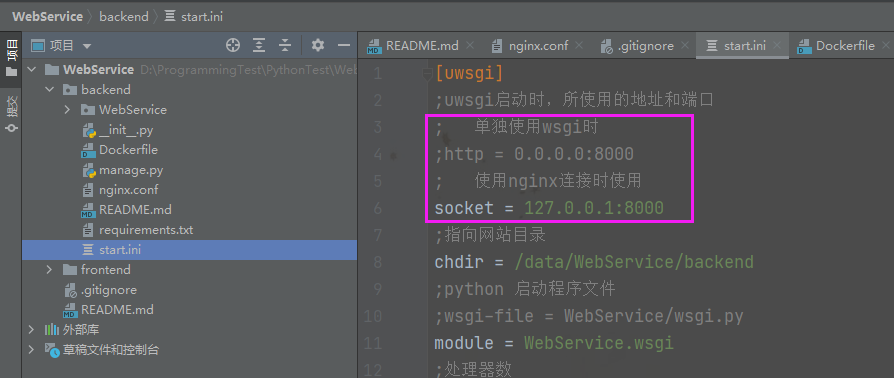
使用 uwsgi 服务器启动服务
1
uwsgi --ini /data/WebService/backend/start.ini
- 浏览器打开 http://120.27.135.145:9048/(在使用 Django 或 uwsgi 服务器时,需要确保互相不同时使用,否则会有端口占用冲突)
使用 Nginx 启动服务
1
2
3
$ cp /data/WebService/backend/nginx.conf /etc/nginx/sites-enabled/nginx.conf
$ /etc/init.d/nginx restart
$ nginx -s reload使用 nohup 后台运行
1
2
3
nohup python3 /data/WebService/backend/manage.py runserver 0.0.0.0:8000 >>/data/WebService/backend/log/output.log 2>&1 &
ps -aux|grep manage.py| grep -v grep | awk '{print $2}'
kill -9 2619使用 Supervisor 运行
1
2
3
4
5
$ supervisord -c /etc/supervisord.conf
$ cp /data/WebService/backend/supervisor.conf /etc/supervisor/conf.d/supervisor.conf
$ supervisorctl update
WebService: added process group # 其实这个时候已经开始运行后台了
$ supervisorctl restart WebService注意:单独使用 uwsgi 和使用 Nginx+uwsgi 组合,使用的是同一个配置文件,即 start.ini,切换时需要修改对应项。当直接使用 Django 时不需要修改该配置文件。
本博客所有文章除特别声明外,均采用 CC BY-NC-SA 4.0 许可协议。转载请注明来自 浅幽丶奈芙莲的个人博客!